Viagra gibt es mittlerweile nicht nur als Original, sondern auch in Form von Generika. Diese enthalten denselben Wirkstoff Sildenafil. Patienten suchen deshalb nach viagra generika schweiz, um ein günstigeres Präparat zu finden. Unterschiede bestehen oft nur in Verpackung und Preis.
Layout


Triple Tibial Osteotomy (TTO)
Objective:
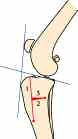
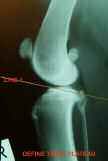
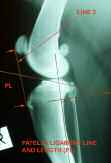
Define the tibial plateau (TP) slope
This operation is based on the biomechanical analysis performed
by Dr Slobodan Tepic, which revealed that in order to remove theshear strain from the cranial cruciate ligament the tibial plateauxshould be perpendicular to the patellar ligament. There are two
Draw a line from the cranial aspect
basic ways to achieve this; i) advance the tibial crest (the basis of
of the medial tibial condyle to the
the Tibial Advancement technique described by Professor
apex of the popliteal notch. (i.e.
Montavon and ii) alter the alignment of the tibial plateaux to the
approximately the cranial and cau-
patellar ligament to 90 (a modification of the Slocum technique).
dal cruciate ligament insertions)
Dr Warrick Bruce reasoned that rather than doing one technique or
the other, there is merit in doing a little of both to achieve thesame outcome, but with less radical angular changes. In the opera-tion of triple tibial osteotomy (TTO) a small closing wedge
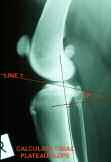
The Tibial Plateau angle may be
osteotomy is performed and this simultaneously advances the tib-
determined by drawing a line
ial crest (see figures below).
along the long axis of the tibiathrough the overlapping inter-condylar eminences as shown.
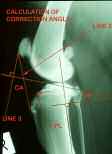
Please note that the Tibial Plateauangle, although of interest, is notinvolved in calculation of theCorrection Angle (CA). Theimportant relationship is thatbetween the tibial plateau and thestraight patella ligament.
Pre-operative patient assessment
Every patient is assessed for the degree of lameness, overall align-
ment of the limb, stifle range of movement, as well as the degree
Draw a line marking the cranial
of stability within the joint.
edge of the straight patellar liga-ment (PL) from patella to tibial
Pre-operative radiographic assessment
tuberosity (line 2).
Standard lateral and craniocaudal views of stifles are required.
Draw a line perpendicular to the
The stifle is positioned in extension for the lateral view (fully
TP (Line 3). Start line 3 at the
extending the joint without forcing it). Ensure that there is no cra-
cranial aspect of the patellar liga-
nial subluxation of the tibia (with this degree of extension the col-
ment insertion (proximal end of
laterals should be tight and therefore the tibia should not be sub-
luxated however, when in doubt compare it with the contralateralside). The hip is packed up and the femur and tibia positioned
parallel to the plate.
Calculate the correction angle
The femoral and tibial condyles
(CA) degrees. This is the angle
should be superimposed on top of
between lines 2 and 3.
each other. Sometimes this is verydifficult to do!
Calculate the wedge angle (WA)
The X-ray beam should be centered
(= (0.6 x correction angle) + 7.3
at the tibial plateau.
A summary of the pre-operativeradiographic calculations is as fol-lows:
Measure length of line 2 . (the
With the patient now in lateral recumbency with the affected
patellar ligament length in mm
leg down and parallel to the operating table, the sartorius mus-
cle and the crural fascia are reflected from the medial aspect ofthe tibia, taking care to preserve the saphenous blood vessels
Mark a point (at the caudal
aspect of the cranial cortex of thetibia) exactly the length of the
An appropriately sized pre-contoured TPLO plate is placed
patellar ligament distal to the tib-
against the medial surface of the tibial to check that the plate is
ial tuberosity (ie from the distal
adequately contoured. Adjust the plate molding accordingly.
end of line 2). This point is the
Using the osteometer or a surgical ruler, measure the predeter-
distal end of the tibial crest
mined TCO from the distal end of the joint capsular incision,
parallel with the tibial crest, and mark the location of the distalextremity of the TCO with the bone scribe. This point is placed
Draw the tibial crest osteotomy
caudal to the cranial cortex of the tibia. Check that there is
line (TCO). It is made parallel
enough room to apply the selected plate.
to the axis of the tibial shaft and
A 2mm hole is drilled at right angles to the tibia at this point. It
is usually parallel to the cranial
is helpful to make this a generous 2mm by gently moving the
aspect of the tibial crest. Itsproximal end should be cranialto the cranial aspect of themenisci. Measure the TCO inmm.
Define the wedge position (WP= half of the TCOmm) along theTCO and draw a line (extendingcaudally from the TCO line) per-pendicular to the TCO at thislocation. This line marks thecentre line of the wedge. Itscaudal end is the apex of the
drill bit in and out of the hole. This will ease introduction and
wedge, the base of the wedge is located along the TCO an equal
removal of the saw guide.
each side of this centre line.
The pin on the saw guide is then inserted into this hole and thesaw guide is aligned parallel to the tibial crest.
The TCO is completed from the distal hole in the tibia through
The patient is positioned in dorsal recumbency for the initial part
to the tibial plateau. The patellar ligament is protected at all
of the surgery which is to explore the medial aspect of the stifle
joint.
Make a medial parapatellar approach to the stifle. Incise medialfascia and joint capsule together (electrocautery is great for this).
Inspect intra-articular structures. Remove torn ends of cruciate.
Inspect menisci, if meniscal injury is present then resect injuredportion. Perform a partial meniscectomy in preference to a com-plete meniscectomy where possible. The protocol for dealingwith case where there is no obvious meniscal pathology is:a)
Fresh complete rupture with no meniscal pathology.
Perform meniscal release by incising the caudal menisco-tibialligament of the medial meniscus.
b)
Partial rupture no meniscal pathology. Leave menisci
alone; just resect the ruptured portion of the CrCL. However,check the remaining intact CrCL bands by placing a curved
The TCO is checked to ensure that the osteotomy is complete.
haemostat behind them and applying some pressure to make sure
The length of the TCO is remeasured. A point halfway along
they are not stretched or incompetent but have reasonable
the TCO is marked. Invariably this point is located at the base
strength. Lavage joint and partially close capsule and fascia together in onelayer (cruciate pattern PDS suture).
For dogs weighing less than 35 kgs, use a medium VI TPLOplate (TPLO353557).
For dogs 35Kg or heavier, use a large VI TPLO plate(TPLO353579). Use the angle finder and overlay to select a plateoffering best fit for the caudal 2/3 of the proximal tibia. Smallerplates are available for dogs less than 20kgs. It is recommendedthat the appropriate size of plate is pre-contoured by twisting theproximal portion of the plate 10- 15∞ towards the midline.
of the medial collateral ligament.
and aligned along the marked centre line.
The osteometer is now used as a set square to mark a line from
The hooked end of the osteometer is then placed between the
the TCO halfway point perpendicular to the TCO.
saw guide and the tibia and hooked behind the guide pin.
Please note that the osteometer is now a double sided measuringdevice and no longer has a peg to be pushed into the TCO. Theleading edge of the osteometer is instead laid along the TCO. The origin of popliteal muscle is elevated from the caudal aspectof the tibia in the area adjacent to this mark. A spoon Hohman
This arrangement serves to accurately guide the wedge osteoto-my of the tibia. For example if the calculated wedgeangle(WA) is 12 then the osteometer is rotated till half of thisangle (6 ) is adjacent to the perpendicular mark (wedge centre
retractor and a dry surgical swab are used to retract the soft-tis-
line) and the gauge is fixed to the tibia with a 1.4/1.6mm K-
sues at this point to prevent iatrogenic damage to the popliteal
wire through one of the guide holes in the osteometer. The saw
artery. In addition the soft tissues attached to the medial aspect of
guide is then aligned alternatively with the 0 and 12 to create
the tibia either side of marked line are cleared away with a
the appropriate sized wedge. The fine saw blade is used to cut
a full thickness wedge from the proximal tibia. The slot in the
The proximal part of the TCO is then forced apart using a
saw guide is 1.0mm so it important that the blade cut (the
periosteal elevator. This will hinge the tibial crest forward and
width at the teeth) is less than 1.0mm.
allow the insertion of the small blade of the Wedgie more distally
The saw cuts should enter the caudal locating hole so once the
(the handle of the Wedgie is at right angles to the TCO). The
wedge cuts are complete and the sawguide is removed the saw
Wedgie is then carefully rotated to give the maximal amount of
blade should be used to extend the cuts down into the locating
tibial crest advancement (the handle of the Wedgie is now paral-
hole. The wedge is removed and the tibial osteotomy checked
lel to the TCO). In some smaller dogs, it may be easier to insertthe larger blade of the Wedgie more proximally in place of theperiosteal elevator during the wedge osteotomy procedure.
However, the Wedgie must be positioned distal to the wedgeosteomy during the closure of the tibial wedge osteotomy.
A 2mm drill hole is placed at the caudal end of the marked line,but placed 2-3mm inside the caudal cortex of the tibia. As the bone in this region slopes away, it is necessary to startdrilling perpendicular to the bone surface until the drill bitengages the bone. Once this occurs the drill is then aligned per-
to ensure that there are no bone ledges or edges left behind.
The gauze swab and the retractor placed caudal to the tibia are
removed.
A pair of Kern forceps is placed onto the distal end of the tibialcrest. Then one point of a pair of large speed-lock fragment forceps
pendicular to the long axis of the tibia. Additionally the guidehole should run at right angles to the medial surface of the tibiaso that the saw guide in position lies flat against bone. The guidehole (and saw cut) may exit the lateral cortex or even the caudalaspect of the tibia. The proximal tibia will hinge around the guidehole medially. It is worth spending some time working out whereeverything is prior to completing this location hole. Again it ishelpful to slightly enlarge this 2mm guide hole. When this iscompleted the pin on the saw guide is inserted into this drill hole
is inserted into the stifle joint and the other point is hookedaround the jaws of the Kern forceps. The fragment forceps arethen gradually closed using a combination of the speed-lockthreads and upward pressure on the foot (tibial thrust action).
This action serves to gradual close the tibial wedge osteotomy atthe same time keeping the caudal tibial cortex intact. This pro-vides a very stable situation as the bone is in affect being moldedinto its new shape. Reducing the tibial wedge also causes the tib-ial plateau to rotate forwards which serves to hold the tibial crestin its new advanced location. If it is difficult to completely close
tively and subsequent injections are given weekly for 4 weeks.
Exercise
Enforced rest is required for the first 6 weeks following TTO
surgery. This means the dog should be confined to a small
room or run for the duration of this period. The only exercise
allowed is short-duration (10 minutes maximum), slow walks
on a leash for toileting purposes. Walking up and down flights
of stairs, jumping up, or any uncontrolled activity must be
avoided. Take care to avoid slipping when walking on wet or
the wedge it may be necessary to re-cut the apex of the wedge
smooth surfaces. An old towel can be used as a hind-quarter
near the locating hole.
sling if it is placed underneath the abdomen.
Once the osteotomy has been closed the plate is rechecked and
any necessary molding adjustments are made. The plate is then
fixed to the bone using cortical screws except in the top two
Postoperatively, physiotherapy in the form of passive range-of-
holes when long cancellous screws are used without prior tap-
motion exercises can be performed after RJB removal. Ideally,
ping. The load guide is also used to apply axial compression. The
all joints of the affected limb should receive physiotherapy 2 to
resected wedge is used as a bone graft and placed into the trian-
3 times a day but instruct clients to concentrate mainly on the
gular space left behind the tibial crest.
stifle joint if time is short. During each session, a minimum of
Following wound lavage, the sartorius muscle, the fascia and the
10 flexions and extensions should be performed on each joint.
rest of the joint are closed with monofilament absorbable sutures.
After flexion and extension of the individual joints, the entire
If TCO fractures at its distal end then stabilize the TC using a sin-
limb should be cycled through its full, pain-free range-of-
gle K-wire and a tension band wire (passed in a fig-8 between
motion 10 times. It is very important never to force the joints
1.5mm diameter holes). Avoid placing the pin too high as this
or cause pain, but gently manoeuvre the limb through a range-of-motion that is well tolerated.
Longer-term follow-up and care:At around 6 weeks post-operatively a radiograph of the stifle toassess the progress of healing are recommended. All goingwell, controlled exercise on a leash may begin at this time.
Leash walks should be minimal at first (15 to 20 minutes twicedaily), and then gradually increased after 8 weeks post-opera-tively. Sit /stand exercises should also begin around 6 weeks post-operatively. This can be achieved during leash walking bycommanding the dog to "sit" and just before the dog assumesthe sitting position, the command to "walk-on" is given. Thisroutine is repeated 10 or more times every walk and has the
may lead to tibial crest fractures
effect of building the quadriceps muscle mass, which is very
Close rest of soft tissues routinely. Apply an RJB for 3-5 days
important in rehabilitation following cruciate repair. There
post-op. Take post-op films.
should be no unsupervised exercise, and running and jumpingshould be avoided during the 6 to 12 week post-operative peri-
TTO Post-operative Care Instructions
od. Between 8 and 12 weeks, exercise can be increased slowlyto 30 to 40minutes twice daily. Deep-water swimming for 10 to
15 minutes several times a week, if possible, is excellent thera-
The following medications are suggested:
py at this stage. By 12 to 16 weeks the patient should have
A NSAID (e.g. carprofen, meloxicam, firocoxib) is used for a
returned to near normal activity. However, there is a large vari-
minimum of 7 days.
ation in how quickly individuals return to full function follow-
Oral antibiotics (e.g. cephalosporins, clavulonate-amoxicillin) are
ing TTO surgery. If there is not near normal activity by 12 to
used for 5 days.
16 weeks post-operatively, then make an appointment for
Cartrophen-Vet injections starting at around 19 days post-opera-
Source: http://www.veterinary-instrumentation.co.uk/skin1/admin/UserFiles/File/TTOEmail.pdf
K9947V3 5/08 Rev. A ADEMCO 5821 Temperature Sensor & Flood Detector INSTALLATION AND SETUP GUIDE GENERAL INFORMATION TAMPER SUPERVISION The ADEMCO 5821 Temperature Sensor & Flood Detector The 5821 tamper supervision feature (Loop 4) causes a is a wireless transmitter used with Honeywell's ADEMCO trouble signal to be sent to the control if the unit's cover is
Acta Anaesthesiol Scand 2008; 52: 897–907 r 2008 The Authors Printed in Singapore. All rights reserved Journal compilation r 2008 The Acta Anaesthesiologica Scandinavica Foundation ACTA ANAESTHESIOLOGICA SCANDINAVICA Pre-hospital airway management: guidelines from a taskforce from the Scandinavian Society for Anaesthesiologyand Intensive Care Medicine ERLAC , P. K. HYLDMO , P. KONGSTAD , J. KUROLA , A. R. NAKSTAD and M. SANDBERG


